Polymer clay Tom and Jerry – DIY step by step tutorial
Polymer Clay Tom and Jerry – DIY Step by Step Tutorial
In this DIY tutorial, we will learn how to create the iconic cartoon characters as of polymer clay Tom and Jerry. These beloved characters have brought laughter to many generations, and now you can bring them to life in clay form. So let’s grab our materials and get ready to sculpt!
Materials Needed for creating polymer clay Tom and Jerry figurines
- Polymer clay in various colors (brown, white, black, gray, red, yellow, green etc.)
- Clay sculpting tools
- Oven and baking tray
Process
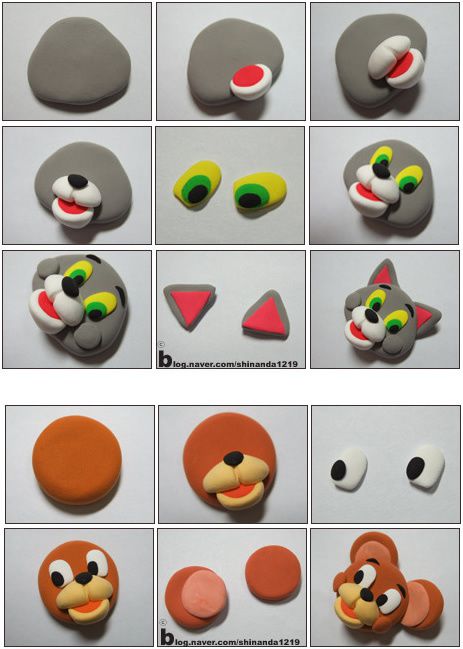
Before we begin, gather some reference images of Tom and Jerry to guide you throughout the sculpting process. This will help you capture their distinctive features and expressions accurately. I’ve followed the tutorial from shinanda (picture bellow) and the result is as expected. I will add pictures with my figurines after baking them.

Using brown clay, shape Jerry’s head into a small oval shape. Sculpt Tom’s head into a larger round gray shape. Add facial features such as eyes, ears, nose, and mouth using smaller pieces of colored clay as shown in the picture above.
Use clay sculpting tools to add fur texture to both Tom and Jerry’s bodies. Create lines and indents to mimic their fur patterns. Pay attention to details 🙂
Baking and Finishing Place your Tom and Jerry figures on a baking tray and follow the instructions on your polymer clay package for baking. Once cooled, you can apply a coat of varnish to enhance the colors and protect the clay.
Congratulations! You have successfully created polymer clay figures of the beloved characters Tom and Jerry. These charming sculptures can be displayed as decorative pieces, used as cake toppers, or even transformed into keychains or magnets. Let your creativity shine as you enjoy these iconic characters in a whole new way.
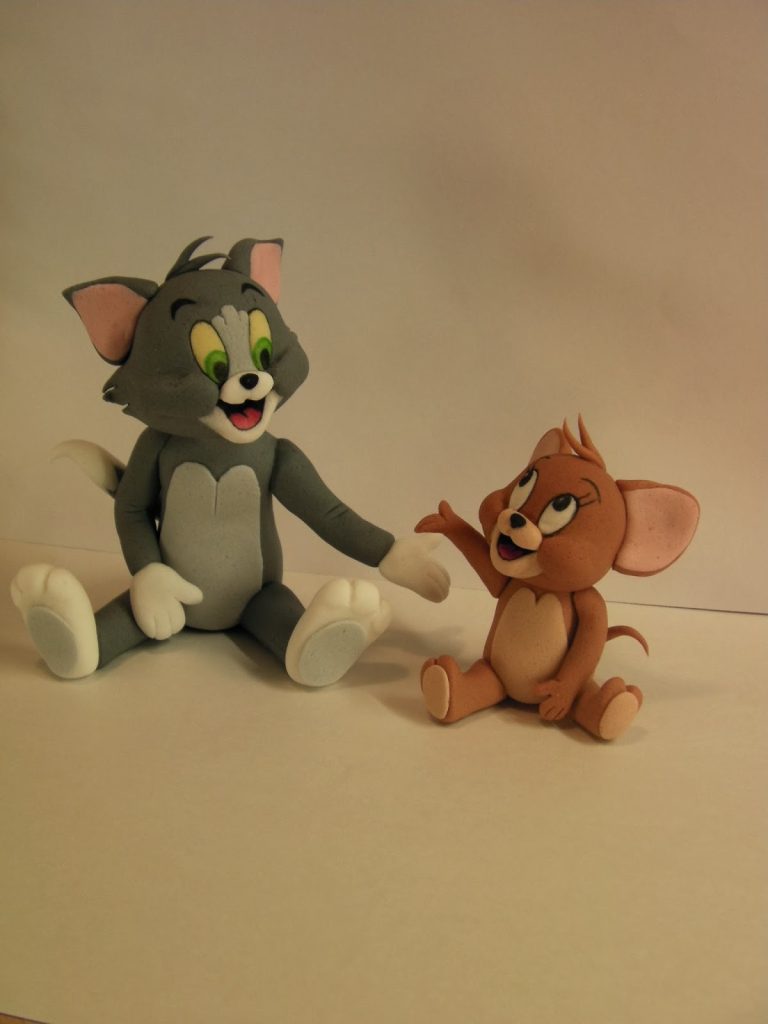
If you are looking for a more advanced project you can try the full body figurines. I have it to my to do list together with this image from figuricezatorte

Keep in touch for more polymer clay/ fimo ideas and free step by step do it yourself tutorials! Click here for free dyi fimo/polymer clay tutorials and save the link on your bookmarks because you will definitely want to check it frequently for ideas and inspiration.
Until next time I wish you all to be creative! I’m always open to suggestion, please leave a comment. Your opinion is valuable for me.
Don’t forget to follow my Pinterest page. It’s the best way to keep updated with free polymer clay tutorials and clay ideas to increase your creativity.