Polymer clay snowflake cane tutorial – DIY step by step
Before we start with the explanations, I want to tell you where I got this idea of a polymer clay snowflake cane tutorial. The article with snowflake jewelry for winter was more appreciated than I expected. This tutorial meets your need to create jewelry that has the theme of winter. And the easiest way is to create a cane to use it in every jewelry you have in mind. If you haven’t seen the article yet, you must read it! Those jewels were highly appreciated!
For this polymer clay snowflake cane tutorial you will need:
– two colors of polymer clay (blue, white)
– cutter
– roller ping or pasta machine
Step 1
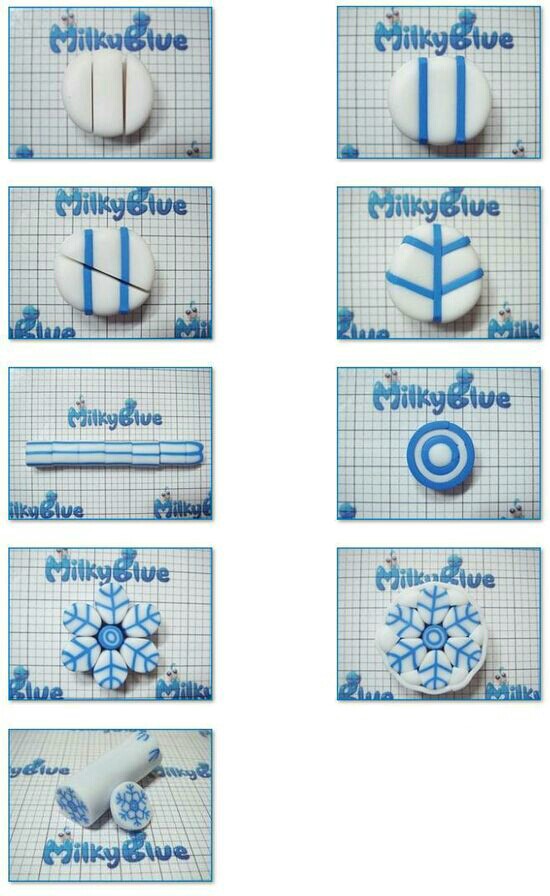
We’ll first create cylinder of white clay and we’ll cut it into three pieces as in figure 1. We’ll move next to the blue color and create a sheet out of it. We’ll put into the two cuts some blue strips as in the second figure and grab the cylinder until the colors of clay stick. We’ll have to cut the cane into half like in the third figure. Next, we’ll have to insert another blue stripe in the cut twisting one of the halves as in the fourth figure. The cane you obtained until this step you have to cut it into six equal pieces.
Step 2
We’ll move next to the center of the snow flake and we’ll have to reproduce the 6th figure. We’ll create a withe roll and cover it in a blue sheet and then in a white one and then in another blue one. Put the six pieces you created before around it. Fill the gap between them with white clay and then surround it with a white sheet. Congrats! If you got here, it means you just created your first polymer clay snowflake cane.
Did you enjoy this DIY step by step polymer clay snowflake cane tutorial? If you are searching for some ideas to use it, here they are: snowflake jewelry for winter .
Thanks a lot to the MilkyBlue author for this lovely tutorial. Here you can find the original author’s post.
Whether you’re browsing for inspiration or want something specific, I make it easy for you to get what you need. By following my Pinterest page you’ll be updated with new ideas and free step by step DIY tutorials.
######
