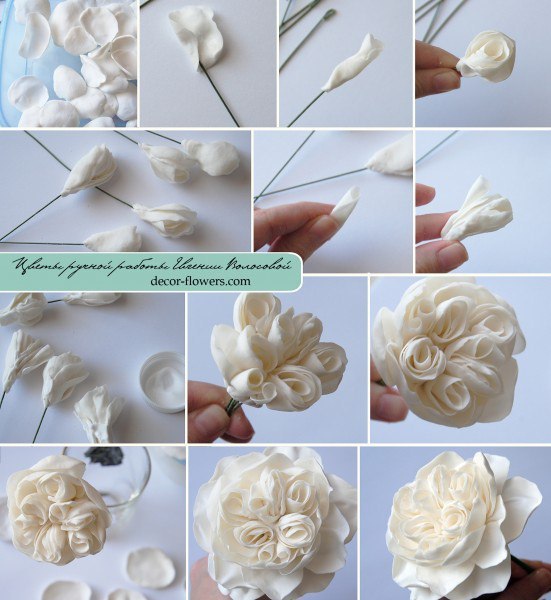
Polymer polymer clay pion shaped rose tutorial
Capture the timeless beauty of a pion-shaped rose with polymer clay. Roses are often associated with love and romance, and their intricate petal arrangements make them a favorite subject for artists and crafters. In this step-by-step tutorial, we will guide you through the process of creating a pion-shaped rose using polymer clay. Let’s dive in and bring the elegance of this classic flower to your crafts! I’ve found this photo tutorial here

Materials Needed for polymer clay pion shaped rose:
- Polymer clay in various colors (for petals, center, and leaves)
- Clay sculpting tools
- Flower petal cutters or templates
- Rolling pin
- Baking tray and oven
- Varnish or glaze (optional)
Step 1: Conditioning and Shaping the Clay Begin by conditioning the polymer clay, kneading it until it’s soft and pliable. Roll out the clay to a uniform thickness using a rolling pin. Choose the colors you want to use for the petals, center, and leaves.
Step 2: Shaping the Petals Using flower petal cutters or templates, cut out petal shapes from the colored clay. Use clay sculpting tools to add texture and details, such as veins and ruffled edges, to the petals. Repeat this process to create multiple petals in different sizes.
Step 3: Creating the Center Form a small ball or cylinder shape using a contrasting color of clay for the center of the rose. Use your fingers or tools to shape and texture the center, adding depth and realism.
Step 4: Assembling the Rose Start by attaching the smallest petals around the center, slightly overlapping them to create a bud-like appearance. Gradually add larger petals, layering them and positioning them in a spiral pattern. Gently press and blend the clay together to secure the petals.
Step 5: Adding Leaves Roll out green clay and cut out leaf shapes using leaf cutters or templates. Attach the leaves to the stem or base of the rose, positioning them as desired. Use clay tools to create veins and texture on the leaves.
Step 6: Baking and Finishing Carefully transfer the rose onto a baking tray and follow the manufacturer’s instructions for baking. Once the clay has cooled, you can add a layer of varnish or glaze to enhance the shine and protect the finish.
Congratulations! You have successfully created a beautiful polymer clay pion shaped rose. This versatile flower can be used in various craft projects, including jewelry, home decor, and floral arrangements. Experiment with different colors and sizes to create your own unique rose designs. Enjoy the process of working with polymer clay and let your creativity bloom!
Keep in touch for more polymer clay/ fimo ideas and free step by step do it yourself tutorials! Click here for free dyi fimo/polymer clay tutorials and save the link on your bookmarks because you will definitely want to check it frequently for ideas and inspiration.
Until next time I wish you all to be creative! I’m always open to suggestion, please leave a comment. Your opinion is valuable for me.
Don’t forget to follow my Pinterest page. It’s the best way to keep updated with free polymer clay tutorials and clay ideas to increase your creativity.