Polymer clay circle in a square cane DIY step by step tutorial
In this article I’ll show you how to create a polymer clay circle in a square cane. It’s a very simple tutorial that you’ll enjoy!
Things you’ll need for this easy polymer clay circle in a square cane:
– two polymer clay colors (in this case red & black)
– pasta machine
– extruder
– cutter
Process:
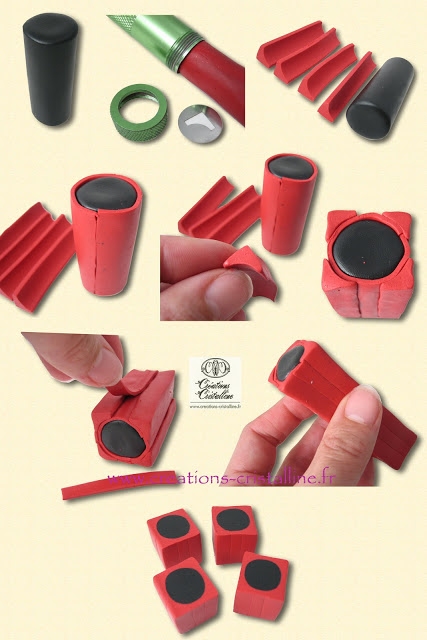
Take a black piece of black clay and make a roll the size of the extruder cover. For now we have the circle and all the work from now on will be to create the square around it. We’ll take the red clay and we’ll process in the extruder with the shape from the second image. We need for shapes by roll size.
As a next step we’ll cover the black roll in a thin red sheet. After, we’ll add the pieces we created with the extruder keeping the same distance between them. It started to look like a square, but we have one more step until we are done! Make thin rectangle sheets. The length of the rectangle must be equal to the roll length and the width equal to the distance between the pieces processed in the extruder. Reduce the cane to get rid of the stripes between the blocks
Our polymer clay circle in a square cane is ready!
I hope you enjoy this polymer clay circle in a square cane tutorial. I found it here.
I’m interested in what polymer clay do you use! Please leave a comment and choose one or more if case: Fimo, Premo, Sculpey, Cernit, PVClay, Kato Polyclay, Filani, Du-kit, Pardo, and Garie Sim’s Play Clay.
Don’t forget to follow my Pinterest page to get new ideas and updates on free fimo/ polymer clay free tutorials.
Thank you so much for visiting! I hope to see you soon! If you have any ideas you want to share please contact me.
######
