Polymer clay cheerful smurf – DIY step by step tutorial
Polymer Clay Cheerful Smurf – DIY Step by Step Tutorial
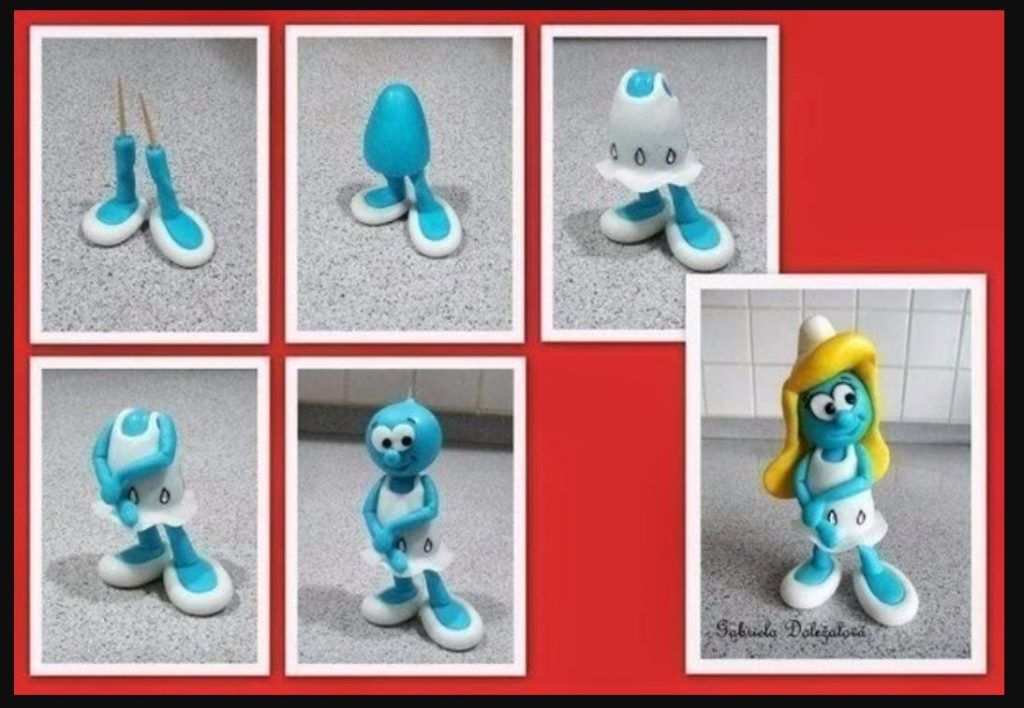
In this DIY tutorial, we will embark on a fun adventure to create a polymer clay figurine of the cheerful and lovable Smurf. With some basic sculpting techniques, you can bring this iconic blue character to life and add a touch of whimsy to your polymer clay creations. I’ve found this step by step polymer clay smurf photo tutorial on the page of an amazing cake decorator, check the page here

So let’s get started!
Materials Needed:
- Polymer clay in blue, white, red, and black
- Clay sculpting tools
- Rolling pin
- Baking tray and oven
Step 1: Reference Images
Gather some reference images of the Smurf character to help you visualize its proportions and details. This will guide you as you sculpt the figurine.
Step 2: Shaping the Body
Take a portion of blue polymer clay and roll it into a smooth ball. This will be the main body of the Smurf. Shape it into an oval form and use your fingers to flatten the bottom for stability.
Step 3: Creating the Head and Face
Using a smaller piece of blue clay, shape it into a smaller oval for the head. Attach it to the body using gentle pressure. Use a clay tool to create facial features such as eyes, nose, and mouth. Use white clay to make small spheres for the eyes and attach them to the head.
Step 4: Sculpting the Hat and Clothes
Using red clay, shape a cone-like form to create the Smurf’s hat. Attach it to the head and gently blend the edges. Use additional blue clay to sculpt the Smurf’s clothes, such as pants and a shirt. Add details like folds and seams for a more realistic appearance.
Step 5: Adding Arms and Legs
Using blue clay, shape two small cylinders for the arms and attach them to the body. Sculpt fingers by gently pressing lines into the clay. For the legs, shape two longer cylinders and attach them to the bottom of the body.
Step 6: Facial Details and Accessories
Use black clay to create the Smurf’s eyebrows and mouth. Add any additional details like a white hat band or other accessories to personalize your Smurf.
Step 7: Baking and Finishing Touches
Follow the instructions on your polymer clay package for baking. Place your Smurf figurine on a baking tray and bake it according to the recommended temperature and time. Once cooled, you can apply a thin layer of varnish for a glossy finish.
Conclusion: Congratulations on creating your very own polymer clay Cheerful Smurf figurine! This delightful character can be displayed on a shelf, used as a cake topper, or given as a gift to a fellow Smurf enthusiast. Feel free to experiment with different poses and accessories to bring even more fun to your polymer clay creations.
Keep in touch for more polymer clay/ fimo ideas and free step by step do it yourself tutorials! Click here for free dyi fimo/polymer clay tutorials and save the link on your bookmarks because you will definitely want to check it frequently for ideas and inspiration.
Until next time I wish you all to be creative! I’m always open to suggestion, please leave a comment. Your opinion is valuable for me.
Don’t forget to follow my Pinterest page. It’s the best way to keep updated with free polymer clay tutorials and clay ideas to increase your creativity.