As Easter is approaching, I’ve decided It’s a great time for a polymer clay bunny tutorial. Your children will definitely enjoy having your house decorated with these!
You can also teach them how to make their own, as this DIY bunny is extremely easy to make. This way you will spend quality time together crafting.
The polymer clay bunny is also an interesting and cute gift for your loved ones.
Let’s start learning how to create it step by step!
For this type of polymer clay bunny you will need:
-beige, pink, black and white polymer clay
-a toothpick
-glue
-a cutter
1st picture: You can see all the ingredients needed.
2nd picture: Model the beige polymer clay into a cone – this will be the bunny’s body.
3rd picture: Add two smaller beige balls to the bottom of the body and press them to it – here you will attach the bunny’s paws (6th picture)
4th picture: Use the white polymer clay (or any lighter colour you have) for the bunny’s fur, in order to create a “fluffy-effect” on
its belly.
5th picture: Make two small beige balls and then press them – these will be the bunny’s paws
6th picture: Use the white polymer clay and make: 2 small balls and 6 smaller balls; press them and then add them on the result from
the 5th picture – here you have the final version of the paws
7th picture: Add the paws to the small balls from the 2nd picture
8th picture: Shape the bunny’s superior paws using the cutter
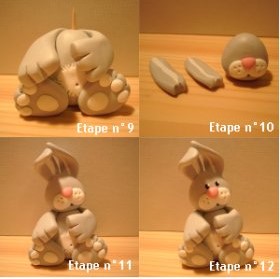
9th picture: Place the paws on the bunny’s body; add the toothpick in the middle of the body, so you can place the bunny’s head onto it
10th picture: Make a beige polymer clay ball; add a pink polymer clay triangle in the middle of it; surround it with the white
peanut-shaped polymer clay; use another toothpick to drill the white side and to make a tiny hole under it – this will be the bunny’s mouth.
Shape two lengthy beige polymer clay and add a slim white polymer clay in the middle of each – these will be the bunny’s ears
11th picture: Place the head on the bunny’s body and then add on the ears.
12th picture: Use the black polymer clay to make tiny balls; place them on the head – these will be the bunny’s little eyes.
And voila! You’ve just created your very own bunny! I found my inspiration here .
I find this polymer clay bunny tutorial easy to follow and the result is adorable!
For more tutorials like this one, follow my Pinterest page!
######
