Polymer clay chef DIY step by step tutorial

There’s something special in this phrase – “home cooked meals”. I always believed that home cooked meal is a good way to balance things out and ensure quality family time. The reality is that I may not have the time or energy to cook like that every day. For some people cooking is a way to relax, but for me the best way is to play with fimo and create little dreams. Since I began to use fimo, I’ve been trying to portray everything.

We all have that friend with culinary pleasure. Does not matter the season, the time or the event,  she/he is in the kitchen in every single occasion. This article and product is for mine. You can surprise your friend with this fimo chef figurine by following this free dyi fimo tutorial. Never assume you have no relevant experience or knowledge. Many skills are about perseveration, life experiences will help you even if they seem to be worlds apart.

Don’t forget to follow my Pinterest page to get updates on free fimo diy tutorials.

Polymer clay chef DIY step by step tutorial

Things you need for making a fimo chef:

-three colors of fimo: white, beige, black

and a lot of passion or a good reason!

Bellow you can find photos with steps use them as a model to create your own polymer clay chef figurine.

Polymer clay chef DIY step by step tutorial

Polymer clay chef DIY step by step tutorial

Polymer clay chef DIY step by step tutorial

Fimo is for my the best way to relax and feel free. My mind flies beyond barriers and my hands creates the impossible. Go find your passion and let’s make a polymer clay chef figurine.

Great job lucristalbiscuit!!!
######

polymer clay hydrangea flower – DYI step by step tutorial

The hydrangeas flower is the national flower of Bangladesh. It symbolizes love and life. Some brides choose water lilies bridal bouquets since it represents chastity and purity of the heart and soul.

Below is a free tutorial on how to make a polymer clay hydrangeas flower. I don’t reminder were from came this crazy idea, but why not? Nothing seems complicated after you did it. I hope you find this tutorial as all the answer to the question: “how to make a polymer clay hydrangeas flower?”. I hope you find this free dyi hydrangeas flower tutorial useful regarding your fimo ideas .

Don’t forget to follow my Pinterest page to get updates on free polymer clay diy (do it yoursel) step by step tutorials


For making a polymer clay hydrangeas flower you will need:

– one color of clay (if you are an experienced clay user you can mix the colors for a better product or you can just paint them at the end. The real flowers are a subtle mixture of loads of different colors )

polymer clay hydrangea flower - DYI step by step tutorial

Method:

  • take a piece of clay and with your fingers make a drop out of if
  • on the bigger part cut a cross. You will have now four petals
  • push the petals out with a toothpick.
  • put one of the petals upright and roll up on itself
  • let out the rest of petals overlapping each other
  • Cut other rose, now the next size and repeat the same operation with the modeling tool.
  • This time put the previous bud in the center of the flower and let out the rest of petals overlapping each other(use a toothpick)
  • cut another set of petals and repeat operations (you can repeat this until you have the dimension you need)

I have always loved the delicacy and vibrancy of Hydrangea flowers so I really enjoyed trying to replicate them in fimo. Regarding the colors there is not a correct way to do but I usually go for gradually building up the different colors until I’m happy with the result.

For sharing on pinterest, you may consider using this photo:

Click here for more free dyi polymer clay flower tutorials and ideas.
######

FIMO DIY tutorial earrings – cascade of flowers

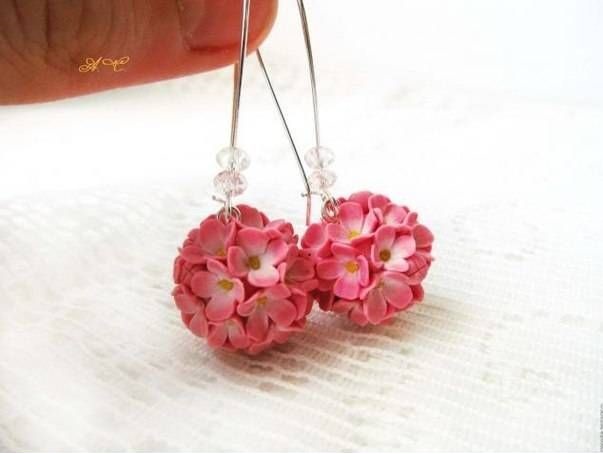
How many times have you walked by a happy lady that had that glamorous thing? And when you came near you realized it wasn’t the shine in her eyes ,it wasn’t the style,  but those perfect earrings? This tutorial will help you have these simple and classic polymer clay cascade of flowers earrings that are perfect with absolutely anything and give you a look of understated sophistication. How many hours did you stand in front of the mirror without any idea what accessories to wear at your first date? I assure you that from now on it will be no time consuming! You’ll have the best accessories to wear at your romantic date! It’s all about selecting something with a unique, yet romantic twist such as flowers!

FIMO DIY tutorial earrings - cascade of flowers

Don’t forget to follow my Pinterest page to get updates on free fimo diy tutorial


Things you need for this beautiful fimo earrings:

– one pair of ear wire

-three packs of fimo: white, yellow, pink

-one link

-fimo glue

and some motivation, because the best way to success is to persevere.


Let dreams came true:

Grab two piece of fimo (one pink and one white), press it and put them one over the other as shown in the figure. Now you have to press them again and then roll up the piece into a cylinder

.FIMO DIY tutorial earrings - cascade of flowers

On the next step you will have to cut the cylinder into thin pieces, those will be the flower petals. Don’t worry if you cannot cut it into equal pieces, you’ll adjust them on the run.

Grab now a little bit of yellow fimo, blend it with your fingers until is really thin. Put it with care on the work surface and cut it into pieces. Take piece by piece and make small balls. Those will be put in the middle of the flowers. Spread  them from the work surface, you’ll only need them at the end.

FIMO DIY tutorial earrings - cascade of flowers


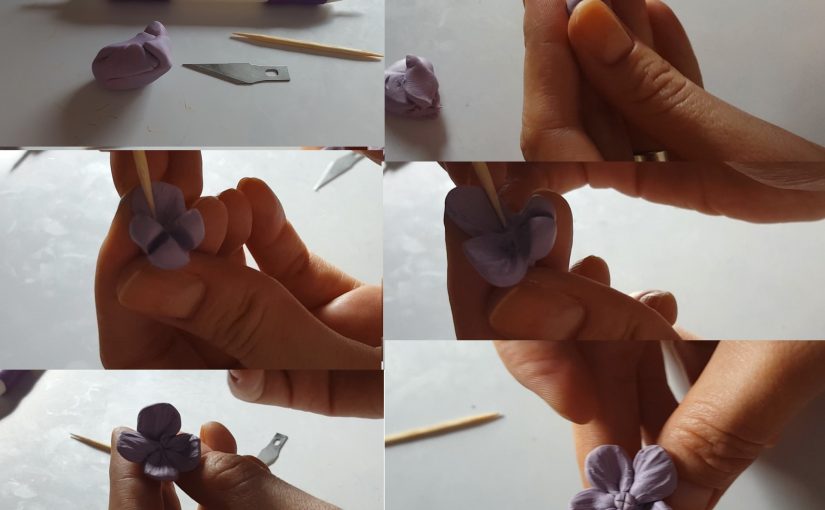
Let’s come back at the pink pieces! Grab one piece and make a drop. Cut it in a “+” and spread a little bit the pieces. If you don’t have a special tool for this you can use a toothpick, a piece of wire or even a needle! Press them until you obtain the flower. Take one yellow ball and push it in the middle of the flower. Cut the excess of the fimo (the strain of the flower), but be aware not to destroy anything.

FIMO DIY tutorial earrings - cascade of flowers

Now you deserve congratulations, you’ve just created your own flower. Put yourself on repeat and make some more! They say that repetition is the mother of skill. If the first flower doesn’t look good don’t give up you have plenty of time to improve!

FIMO DIY tutorial earrings - cascade of flowers

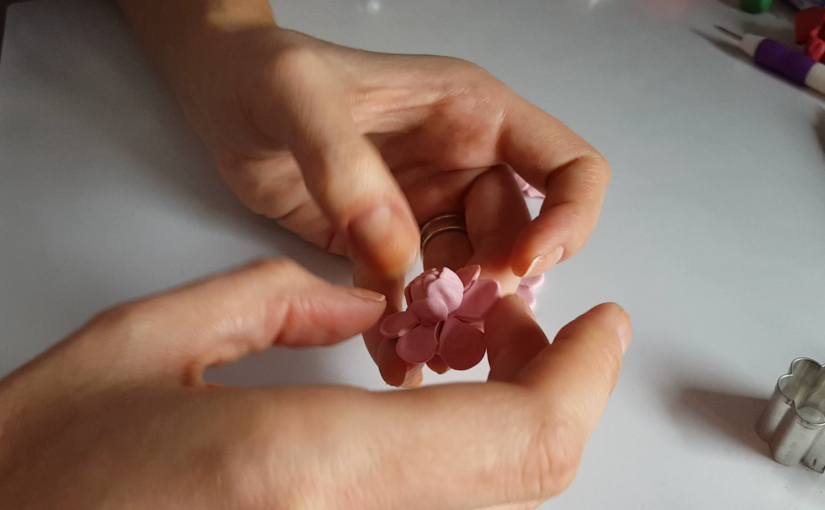
You already passed halfway through. Grab another two equal pieces of pink fimo and blend it until you get balls. Cover them with glue and carefully place them flowers. When all the ball is covered stick the link and go “cook” them! After they have cooled make add them ear wires. The rest is all about the attitude!

FIMO DIY tutorial earrings - cascade of flowers

I wish you all to have a special date! Don’t forget that with greater risk comes greater happiness: the more you are able to surprise the boy on the first date, the stronger your relation with him will be!

Congrats bijouxcherie! This is the best to wear on a first date! The article is in French but is “délicieux”!

For more polymer clay/ fimo earrings tutorial click here

What do you think? Aren’t this polymer clay cascade of flowers earrings just perfect?
######

Diy fimo flower tutorial – polymer clay water lily

Below is a free tutorial on how to make a polymer clay water lily flower. Although it may look complicated it is not. It took me some time until I found this easy method to make a fimo water lily flower. I created this tutorial as an answer to the question: “how to make a fimo water lily flower?”. I hope you find interesting this free dyi water lily fimo tutorial and that it helps you with your fimo ideas .

It symbolizes love and life. Some brides choose water lilies bridal bouquets since it represents chastity and purity of the heart and soul.

Don’t forget to follow my Pinterest page to get updates on free fimo diy tutorials.

Diy fimo flower tutorial - polymer clay water lily

For making a fimo water lily you will need:

– one color of fimo for the petals: white, pink or other colors you have in mind (if you are an experienced fimo user you can mix the colors for a better product)

Diy fimo flower tutorial - polymer clay water lily

Method:

  • Firs let’s make a sheet of fimo
  • Cut out a piece with a flower shape
  • Cup a little bit in the center each petal with a balling tool
  • Collect petals in a bud

Diy fimo flower tutorial - polymer clay water lily

  • Cut out another piece with the same flower shape
  • Cup each petal with a balling tool

Diy fimo flower tutorial - polymer clay water lily

Diy fimo flower tutorial - polymer clay water lily

Diy fimo flower tutorial - polymer clay water lily

Diy fimo flower tutorial - polymer clay water lily

  • This time put the bud in the center and collect petals over it(use a toothpick)
  • Cut another set of petals
  • This time cup the entire petals
  • Put the bud into the center of the third shape and collect the petals as shown in the picture

Diy fimo flower tutorial - polymer clay water lily

Diy fimo flower tutorial - polymer clay water lily

Diy fimo flower tutorial - polymer clay water lily

Diy fimo flower tutorial - polymer clay water lily

Congratulations for your first polymer clay water lily flower!

Diy fimo flower tutorial - polymer clay water lily

Hope you enjoyed this polymer clay water lily tutorial! Click here for more free dyi fimo/polymer flower tutorials.

Until next time I wish you all to be creative!

You may consider following my Pinterest page  to get updates and captivating new free tutorials.

 
######