Polymer clay beautiful bell flower earrings

Today I came back to you with a new idea: polymer clay beautiful bell flower earrings. You will surely get many envious looks whether you wear them to work or at some evening event.

If you are a returning reader you probably figured I’m addicted to earrings. Why I love them so much? Because I’m always cold and in winter earrings are the only things that stand out!

Below are a few bell flower patterns. I know you would like a tutorial on this theme, but for now you can divide and conquer!:)

Polymer clay beautiful bell flower earrings

Polymer clay beautiful bell flower earrings

For a better effect you can use canes or a blended sheets.

Zuzana Liptáková is an artist I’ve been taking about in other articles. I just can’t stop admiring her amazing work . You can find here the creations that she sales.

What do you think about this beautiful polymer clay bell flower earrings? You want to see more earrings ideas? On this page you will find many polymer clay earrings and for sure one will fit for the occasion you have in mind.

Don’t forget to follow my Pinterest page to get new ideas and updates on free fimo/ polymer clay free tutorials.

Thank you so much for visiting! I hope to see you soon!
######

Polymer clay characters

I discover the storyboard for children! If I enjoyed enormously when I found a polymer clay characters shop on etsy, do you realize what it is like for a child to receive this gifts? The nice part of working with polymer clay is that you spend a lot less money and you receive a lot more smiles and happines.

Elvira Carangi is the author of the following amazing miniature characters!
  • World of Oz

Polymer clay characters

  • Alice in Wonderland

Polymer clay characters

  • Little red

  • Ariel

  • Beauty and the beast

  • Collana tinkerbell

  • Disney princess

  • Sailor Moon

  • Princess Sofia

  • Oceania doll

  • Elsa

  • Howl

  • Mafalda

  • Masha and the bear

  • Mrs Pepper

  • Rapunzel

  • Minion

  • Peanuts

  • Fairy

  • Lisa and Seya

  • Disney villains

  • dolls

Did you enjoy this selection of polymer clay characters? I want you to tell me something  and be sincere: are you going to read a story this night while going to bed?

Go to this page if you want to buy any of the character presented above, they are all for sale, and the price is wort it!!!

Don’t forget to follow my Pinterest page to get new ideas and updates on free fimo/ polymer clay free tutorials.

Thank you so much for visiting! I hope to see you soon!
######

12 Polymer clay studs earrings ideas

There are some pieces of jewelry every women should have. On a high position in this list are studs earrings. To meet your needs and to complete your collection I gathered some new polymer clay studs earrings ideas from an artist that I totally love! Zuzana Liptáková is the one that created the following polymer clay studs. If you want to admire her amazing work go to her flicker account.

You can wear studs every single day and the beauty when you are creating them is the fact that for the same amount of many you can have every color!

Enough toking for the moment, pass through the list and tell me which one of the following polymer clay studs earrings you chose?

12 Polymer clay studs earrings ideas


Did you enjoy this selection of polymer clay earrings for special occasions? You want to see more? Go to this page to find more polymer jewelry creations for any occasion you have in mind.

Don’t forget to follow my Pinterest page to get new ideas and updates on free fimo/ polymer clay free tutorials.

Thank you so much for visiting! I hope to see you soon!
######

Polymer clay Halloween pendants and necklaces ideas

Need some unique jewelry for your costume? Find it here! I collected for you some amazing ideas of polymer clay Halloween pendants and necklaces.

Get ready for Halloween with this miniature pumpkin necklace! One small pumpkin is hanging from a bronze chain necklace with a light orange swarovski bead for extra glam.

Source: PieceOfCakeHJ

Polymer clay Halloween pendants and necklaces ideas

Polymer clay Halloween witch pendant necklace

source: JoeyAtelierCreation


Realistic miniature candy corn sweets in a miniature corked glass bottle which was ment to be a sweet necklace  – same source

source: Mimitopia3


Red velvet devil cupcake necklace decorated on the top with whipped cream,cherry sauce and devils horns – same source

For more polymer clay Halloween cupcake pendants click here

Witch Halloween Necklace in clay –  source: PerleDelBosco

Black bat pendant made of polymer clay – source: ViaLatteaArt

This necklace features a small 3D shimmery black witches hat charm made from polymer clay. – source RobynLeesArtwork

Halloween pumpkin face with a cute purple hat, all made of polymer clay.

source: MarisAlley

From the same artist a house disguised in halloween theme as a pumpkin with a stylish big black hat with polka dot design! A cute mini pumpkin is hanging from the hat, too!

Also from the same artist we have a nice idea: funny ghost reminding the Casper we all love!

Another nice idea is a cute creepy pumpkin necklace from BrunaZassou

This less than spooky little lady is looking to bring a little bit of magic to her new home. She is ready to fly to you with broomstick in hand from ShellBellesCreations!

And some other nice polymer clay pendant from the same atist.

The next beautiful pumpkin necklace is realistic looking and extremely detailed. Source: CraftchemyGiftShop

CraftchemyGiftShop had an amazing idea: Vial of Blood Necklace. This beautiful and elegant necklace will make a perfect accessory to your Halloween Costume. Vampire, Witch, even werewolf, all can use a vial of blood. Large glass bottle, featured on bronze tone chain fitted with lobster clasp. Glass bottle is glued shut for safety.

Carved pumpkins are scary enough! What crazy scientist would combine them with gears? Run for your lives cause it change its aspect!

Source: CrumpledFantazies

This brain necklace is the perfect little accessory for Halloween lovers with this creepy veins. This necklace would make the perfect gift for the person who loves being a zombie! If you’re the brains of the operation, or a zombie in disguise, you will love this brain heart necklace. Creepy… but sort of cute, right? TinyTreatz is its artist.

I decided to end up this collection with the same idea as I started it: a witch polymer clay necklace. This one is created by ElviraCarangi

Did you enjoy this selection? You want to see more? Go to this page to find more Halloween ideas to DIY.

If you want any of this polymer clay Halloween pendants check the link from the source: they are all for sale on etsy!

Don’t forget to follow my Pinterest page to get new ideas and updates on free fimo/ polymer clay free tutorials.

Thank you so much for visiting! I hope to see you soon!
######

Polymer clay Halloween cupcake pendants

Need some unique jewelry for your costume? I prepared for you some unique ideas of polymer clay Halloween cupcake pendants to rock the day!

Whenever you are describing a good Halloween party, spooky cupcakes are always part of the deal! But if you are a guest, why not surprise your host with one of this amazing polymer clay Halloween cupcake pendants that will last for years!

1. Red velvet devil cupcake necklace decorated on the top with whipped cream,cherry sauce and devils horns

source: Mimitopia3

Polymer clay Halloween cupcake pendants


2. Creepy realistic zombie brain cupcake polymer clay pendant necklace – same artist as previous

3. Chocolate Spooky R.I.P grave Halloween cupcake necklace! Is decorated on the top with a Biscuit dead stone,green whipped cream for plants,biscuit grave dust and a tiny ghost which glows in the dark. – same artist

4. Chocolate pumpkin cupcake necklace decorated on the top with a tiny pumpkin and pumpkin whipped cream – same source

5. Chocolate funny spooky monster cupcake necklace! Decorated on the top with purple and orange whipped cream and sugar eye balls – same source

6. Open wound with stitches polymer clay Halloween cupcake necklace decorated on the top with cherry sauce 

7. Candy corn cupcake necklace,decorated with whipped cream and yummy candy corn on the top!

8. Spooky ghost Halloween cupcake necklace ! The ghost is glowing in the dark – same artist

Polymer clay Halloween cupcake pendants

Did you enjoy this selection of polymer clay Halloween cupcake pendants?You want to see more ideas? Go to this page to find more Halloween ideas to DIY.

If you love one  of this polymer clay Halloween pendants check the link from the source: they are all for sale!

Don’t forget to follow my Pinterest page to get new ideas and updates on free fimo/ polymer clay free tutorials.

Thank you so much for visiting! I hope to see you soon!
######

20 polymer clay Halloween earrings ideas

Halloween is close and I created for you a nice collection of polymer clay earrings. Get inspiration to create your own or just express your creativity by wearing them! All the pairs described in this article have an etsy link where you can buy them,

Halloween earrings featuring pumpkins and bats handmade from polymer clay. A lovely pair of halloween earrings to trick or treat!

source: EvasCreationsShop

20 polymer clay Halloween earrings ideas

Witch and pumpkin cute stud or magnetic earrings.

source: CandyDesignCrea

From the same artist some unique pumpkin stud, magnetic or dangling earrings.

Halloween Pumpkin & Black Cat Earrings that made from polymer clay and hand painted with Acrylic colors.

source: CatBrothers

Look at that polymer clay vampire stud earrings! They are amazing!

source: KatchenDesignsBerlin

Same source, new idea: Frank and Franka Frankeinstein’s Monster are the twin grandchildren of the famous Frankenstein’s Monster. While the shy Franka dedicates her life to science, Frank loves to be in the spotlight.

These earrings are so adorable! There’s a reason why we say “boo” on Halloween! Same source as on the photo before.

Another nice idea from the same artist: Polymer clay Voodoo Doll Stud Earrings – Creepy & Cute Handmade Polymer Clay Halloween Jewelry for all Ages!

funny cupcake earrings are handmade with polymer clay by omifimo

And don’t forget about witch on the broom!

source: DaliahArt

Lovely polymer clay Halloween Ghosts earrings created by the same artist

Lovely handmade earrings -Cat & pumpkin created by the same artist.

Lovely handmade earrings – halloween bat – vampire, made from scratch by the same artist

Jack the skeleton could not miss any party! Also created by the same artist!

The next polymer clay Halloween cats earrings are also created by the same artist!

Jack the pumpkin polymer clay Halloween earrings are created by the same artist. I find myself in the position to add that is one with many ideas!

Polymer clay Halloween earrings – witch hat

Source: PinkysHandmade

Sweet candy corn stud earrings for Halloween, your trip to the pumpkin patch, going trick-or-treating, or any time!

source: MacaroniNGlitter

Some polymer clay pumpkin earrings, also from the same artist.

Pumpkin pie earrings from the same artist

Did you enjoy this selection? You want to see more? Go to this page to find more Halloween ideas to DIY.

Don’t forget to follow my Pinterest page to get new ideas and updates on free fimo/polymer clay DIY tutorials.

Thank you so much for visiting! I hope to see you soon!
######

Polymer clay dangle wisteria flower earrings – free DIY step by step tutorial

We continue the learning series with polymer clay dangle wisteria flower earrings tutorial. If the name of the flower does not mean ring a bell then picture all those amazing purple japan gardens.

This earrings with wisteria that we will learn to make today will be a great handmade gift proper for any occasion!

For creating this polymer clay dangle wisteria flower earring we will need:

– polymer clay white, light purple, lilac, plum color;
– Artistic pastel of violet and light green color;
– jewelry pins;
– jewelry studs;
– connecting rings 0,5 cm;
– small beads of lilac color;
– chain (link 3x2mm);
– a cutter;
– Flat brush;
– a flat stack;
– rounded tool;
– asponge;
– round nose pliers with pliers;
– foil;
– roller for polymer clay;

Method:

Polymer clay dangle wisteria flower earrings - free DIY step by step tutorial

Step 1:

We’ll start forming the inside flower.  Take a small lilac ball and put it on the eye of the jewelry pin. Cover the eye, give the clay an oval shape and then flatter it. Repeat the process for 21 more times because every earring has 11 flowers.

Step 2:

We’ll continue with small purple petals and we’ll need some light violet clay. For each flower we will need 2 petals, that means 44 in total. Roll a small oval from the clay and use your fingers to flatten it. Apply the violet pastel on one edge of each petal. Put these petals on the sponge with the colored side down. At the top, work them out in a circular motion with a rounded tool. Now, to each lilac core, attach 2 violet petals that you just created.

Step 3:

As a next step we’ll make light petals. You need to mix up some white clay with a small piece of violet. Blind out the petals of a pear-shaped form.On the upper (wide) edge of the petals, apply a little violet pastels and on the lower edge of the petals, apply a brush a little pastels of light green color. We now have to glue the light petals. Take one petal and tie it with a narrow end to the base of the core with the violet petals.

Step 4:

From the same clay we made the small violet petals we’ll form the buds. To do this, put a piece of clay on the eye of the pin and give it the same shape as the lilac inner part of the flower. Repeat the process for five more times because we’ll need six of these buds. Their ends can be toned with a purple pastel.

Step 5:

To make the sepals cut a piece of clay and roll it into a thin layer. Cut out a long strip and use a cutter to cut out really small triangles from one edge of the layer. Then grind the layer in many pieces. This will be the sepal and you need to glue them to the base of the bus.For the last step before baking we have to twirl loops on flowers and buds.You can also attach a number of beads between flowers but be carefully to match the colors.

I hope you enjoyed this polymer clay dangle wisteria flower earrings tutorial!


The result of this polymer clay dangle wisteria flower earrings tutorial it will give your wardrobe a unique style. What would you were with? If you need more details you can find the original tutorial here.

Of course it will look amazing in any color combinations! If you have a pasta machine and you want something a little bit more sophisticated you should try making the flowers using this blended sheets technique.

By following my Pinterest page you will get updates on free polymer clay tutorials and new ideas regarding polymer clay creations.

Thank you for visiting! If you are interested in more free polymer clay tutorials click this link.

To share on pinterest you may consider using this photo:
######

Polymer clay white and blue necklace tutorial – DIY step by step

Let’s create something special! I found a nice DIY tutorial that I want to share with you: polymer clay white and blue necklace.

Polymer clay white and blue necklace tutorial - DIY step by step

For this DIY polymer clay white and blue necklace tutorial you will need:

– polymer clay blue, blue, white, translucent white clay, liquid plastic;
– working surface (tiles, sheet of paper);
– tools (stack, dots, blade for plastics);
– dry pastel blue, blue, white flowers, brushes, wet wipes;
– gloves if you work with them;
– varnish;
– and, of course, the stove to bake the polymer clay;

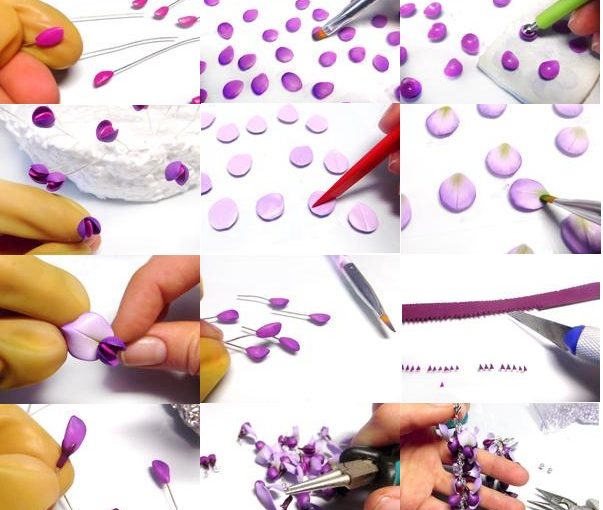
The method is so well detailed in a set of photos that surprise every detail from the process:

Step 1

First of all you should rub the dry pastel with a cutter or knife. This way you will not dirty the other components. Than take a white piece of polymer clay and roll the basics – three oblong balls, we will put them on toothpicks. Than you need to take three equal pieces of translucent white clay and in two of them should add a little of the pastel powder. Roll thin sausages and cut them with a knife or stack into equal pieces.

Step 2:

Take the small pieces from the previous step and roll balls, many identical balls. We smear the upper halves of our blanks with liquid clay and sculpt them on balls in a chaotic order in colors.

Step 3:

For the next step we will make the petals for the central flower from the white clay. Two slightly different sizes. We need 8 flat drop-shaped form and pieces 4 round. Then we make the invoice of the petals with a stack. After that, we nee to thin the petals and to dabble them with blue pastel.


Step 4:

This is how they all look 🙂

Step 5:

Add them to the bubbled bead from the beyond step.

Step 6:

Fallowing the same principle we’ll be covering up with another bead with the longer petals.

Step 7:

For the next bead we’ll need to repeat the process where we cut small pieces from the sausage, but this time we’ll keep them elongated and we’ll cover completely the bead.

Step 8:

Wipe with a damp cloth, leaving the paint in the recesses. After I took the grated white pastel. I typed it a little on the finger and stroked it gently with my finger on the “tops” of the droplets.

For the next bead we’ll  make a more oblong basis. And again we roll droplets of white clay but this time we leave them bulky

Step 9:

I know we’ve been working here for some time but don’t give up! This amazing polymer clay white and blue necklace will worth it!

We take on the finger a little dry pastels of dark blue color and very, very carefully put on the protruding tops. Be careful, one wrong move can spoil everything.

For the leaves we need to make two such oblate oval bases and using a spoke or toothpick, we make a dent on top. Spigot we draw a vein, we make a stack in three places on each side of the depression sheet.


Step 10:

Tone the dark blue pastel of the indentation, erase all unnecessary with a napkin.Make the flattened dark blue droplets and spread them like shown in the photo.

For the  last bead we’ll repeat the same steps as in photos 4,5,6.

In photo 37 you’ll see the best way to bake you can hang the beads for baking.

Step 11:

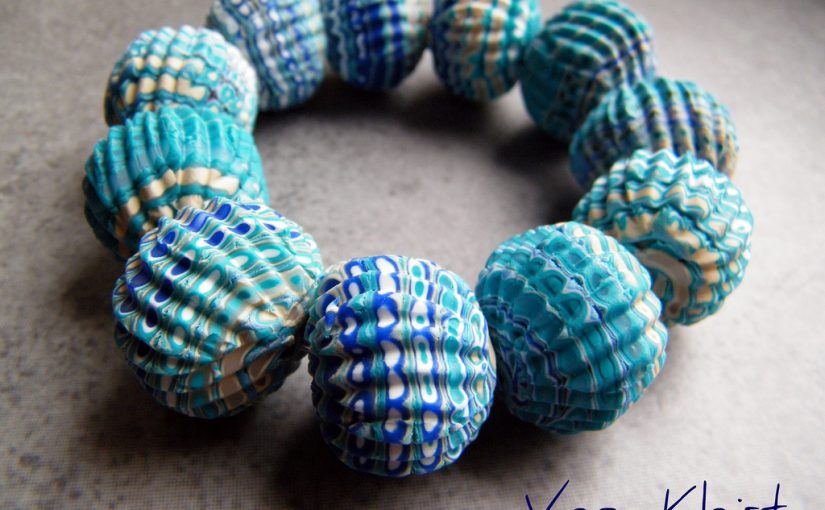
Here are the beads after baking. Don’t forget to give them a shiny look!

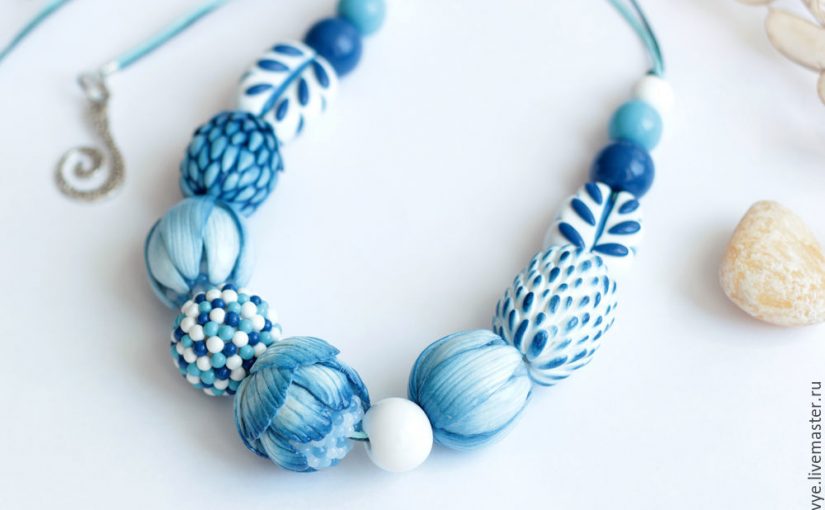
Here is the magical beauty that we just learn how to create! No one will believe that you actually did it yourself 🙂

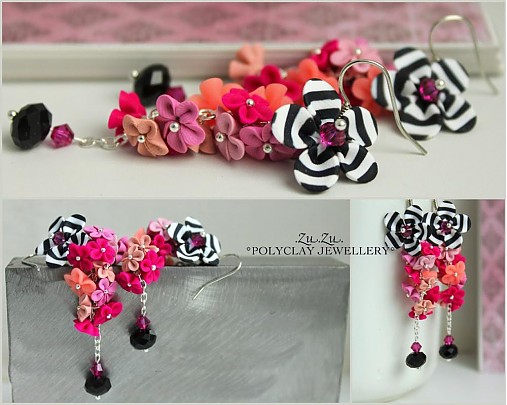
I love the combination of polymer clay an painting idea and this polymer clay white and blue necklace is beautiful an the tutorial is so well explain here that I’ll start created in a moment! What do you think about this polymer clay white and blue necklace tutorial? Of course it will look amazing also in different colors!

Get captivating free polymer clay DIY tutorials just like this one and new polymer clay ideas by following my Pinterest page .

Thank you for spending your time with me! If you are interested in more free polymer clay tutorials click this link.

For sharing on Pinterest please use this photo:

Polymer clay white and blue necklace tutorial - DIY step by step

 
######

31 amazing polymer clay beads ideas

Today’s article is about amazing polymer clay beads. I will present you a collage of beautiful creations of an artist that after several years of working with clay still finds time for new techniques and possibilities.

VERA KLEIST – THOM is a german artist and mom of 4 kids who keep her too often from clay. If she has done this amazing work and at the same time take care of 4 children, ladies we do not have any excuse! 

31 amazing polymer clay beads ideas


This round mosaic idea looks amazing and the color combination are perfect! Here you can find a nice collection of mosaic polymer clay beads that you’ll love!

I love this retro polymer clay cooper beads necklace. Here is a gradient sheet tutorial that will help you mix the colors for this amazing result.

If you are interested in polymer clay beads here you will find more ideas.

I love this polymer clay artist and hers polymer clay beads jewelry! I want them all! What do you think? You can wear all this beauties any season.

Following my Pinterest page to get new captivating ideas and free tutorials.
######

Simple polymer clay beads – handmade gifts under 5$

Making polymer clay beads is fun, easy, cheap, and even makes a great activity for kids on a rainy afternoon or as a birthday party craft. Handmade Gifts are a great wait to show appreciation to family members, friends, and loved ones! There are many people who prefer handmade gifts for their uniqueness and the author’s personal footprint.

Winter is coming and if your gift list is long and your budget is small here are some simple polymer clay beads or great Handmade Gifts that you can make for the girls on the list.

It is time to start the gift making for the Holiday season. And you’ll have very nice ones under 5$. I already started 🙂

For making this simple polymer clay beads you need few different colors of clay and a knock for the skewer or a toothpick.

First step you have to cut the block of clay in equal parts so that your beads will have the same part. If it seems hart to make them the same size you can buy wood beads from the crafts stores and only cover them with clay. I prefer to create them from scratch. To create spherical beads, roll each bead individually between your palms to shape them into spheres

This are my simple polymer clay beads:

Simple polymer clay beads - handmade gifts under 5$

After baking its will be the beautiful beads necklace beads handmade gift for my friend.

This is how I bake them and not damaging the shape 🙂


What do you think? In my opinion this simple polymer clay beads are the best handmade gifts under 5$.

ENJOY CREATING and your friends will enjoy their presents!!!

Get captivating new ideas and free polymer clay tutorials by following my Pinterest page .
######